

A common challenge in AI-powered research workflows is depth versus context. If your agent reads ten web pages, its context window (the amount of text a large language model (LLM) can process at once) gets filled with raw content. If it also runs data analysis code, chart-generation logic competes with strategic reasoning for limited space. Teams typically work around this with manual prompt-chaining or sequential processing.
A better approach is to delegate deep work to isolated subagents that return only concise results. LangChain Deep Agents handles this orchestration, spawning specialized ephemeral subagents and managing their lifecycle. Amazon Bedrock AgentCore provides the infrastructure each subagent needs. This includes a real browser in a MicroVM (a lightweight, single-purpose virtual machine) for web research and a full Python environment for data analysis. AgentCore is also available as a native sandbox provider in the Deep Agents CLI, so you can run deepagents --sandbox agentcore to try AgentCore CodeInterpreter without building a full agent.
In this post, you’ll build a competitive research agent that demonstrates this pattern end to end. This walkthrough targets developers building multi-step AI workflows who need isolated execution environments for their agents. In Part 2 of the notebook, you can deploy this same agent to Bedrock AgentCore Runtime using the AgentCore CLI, so it runs as a managed, session-isolated service.
What you’ll build
Your coordinator agent receives the request and first checks AgentCore Memory for past research insights. It then spawns three browser subagents in parallel for research, each navigating a different competitor’s website in its own AgentCore Browser MicroVM. When the three return structured findings, an analyst subagent receives the combined data and uses an AgentCore Code Interpreter to generate a comparison chart and markdown report. Finally, key insights are saved to AgentCore Memory for future sessions. You can trace the entire workflow with Amazon CloudWatch through Amazon Bedrock AgentCore Observability or LangSmith.
Each subagent type accesses only its specific set of tools: browser tools for the researchers, interpreter tools for the analyst, and memory tools for the coordinator.
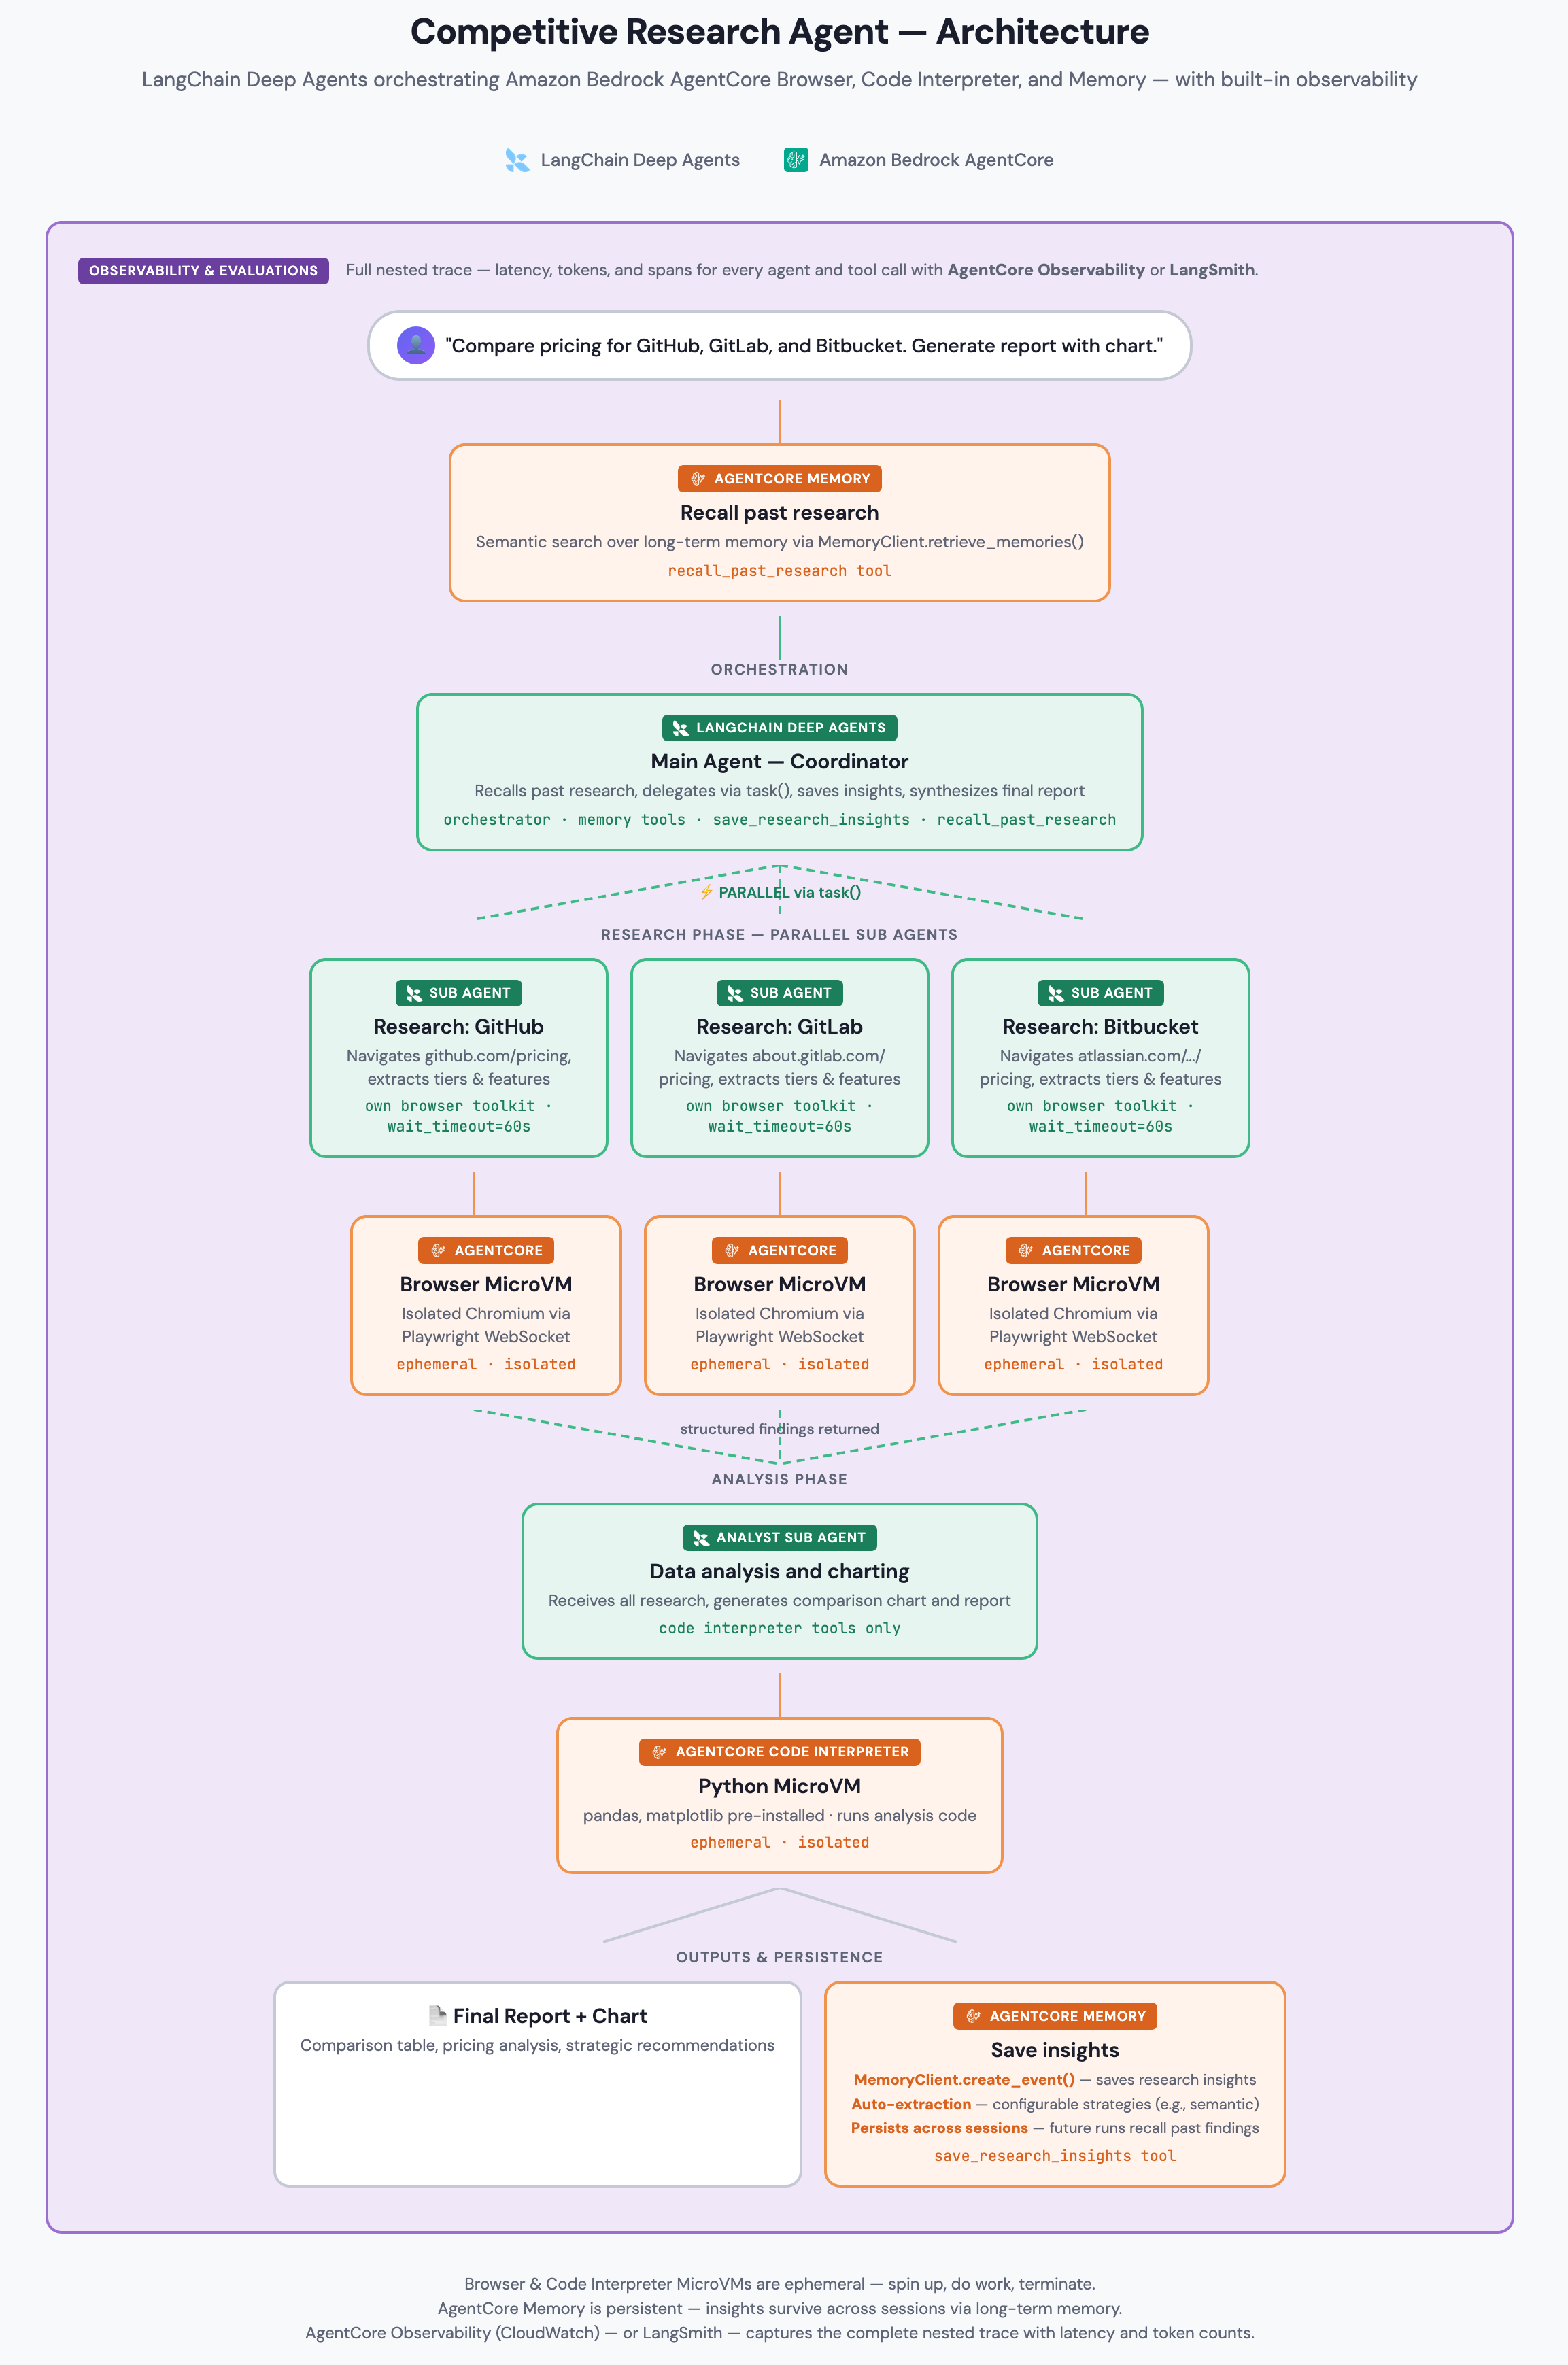
Figure 1: Solution architecture showing the data flow between the LangChain Deep Agents orchestrator, Amazon Bedrock AgentCore Browser MicroVMs, Interpreter, Memory, and CloudWatch or LangSmith tracing.
The following sections walk through each component step by step.
Build the agent
To build this agent, you configure a model, create toolkits for each subagent type, and wire them together with LangChain Deep Agents.
Prerequisites
Before you begin, verify that you have the following:
- An AWS account with Amazon Bedrock AgentCore access enabled
- AWS credentials configured as environment variables (AWS_ACCESS_KEY_ID, AWS_SECRET_ACCESS_KEY, AWS_SESSION_TOKEN, AWS_REGION) or via AWS Command Line Interface (AWS CLI) profile. For required IAM permissions, refer to the AgentCore getting-started guide.
- Python 3.11 or later with pip or uv for package installation
- (Optional) Amazon CloudWatch Transaction Search enabled to view AgentCore Observability traces and spans
- (Optional) A LangSmith account for observability
- (Optional) An AgentCore Memory resource with at least one extraction strategy configured (a rule that determines what knowledge to extract from conversation events)
- (Optional) A runnable Jupyter notebook in the langchain-aws samples repository for the complete implementation
Step 1: Set up the model
The following code configures the LLM that orchestrates your agent. This example accesses Claude Sonnet through Amazon Bedrock:
The us. prefix uses a cross-region inference profile for higher availability. You can also use the base model ID directly.
Step 2: Create browser toolkits
Each competitor gets its own BrowserToolkit, which provisions its own AgentCore Browser MicroVM. You get complete isolation between parallel researchers. The toolkit handles concurrency when the LLM emits multiple browser tool calls in a single turn:
Each MicroVM runs a real Chromium browser connected through WebSocket using Playwright (an open source browser automation library). Sessions are ephemeral and spin up in seconds. The session_wait_timeout is set to 60 seconds (default: 10 seconds) to give browser operations enough time to finish when multiple tool calls run concurrently. The browser tools include navigate_browser, extract_text, click_element, type_text, scroll_page, extract_hyperlinks, and wait_for_element.
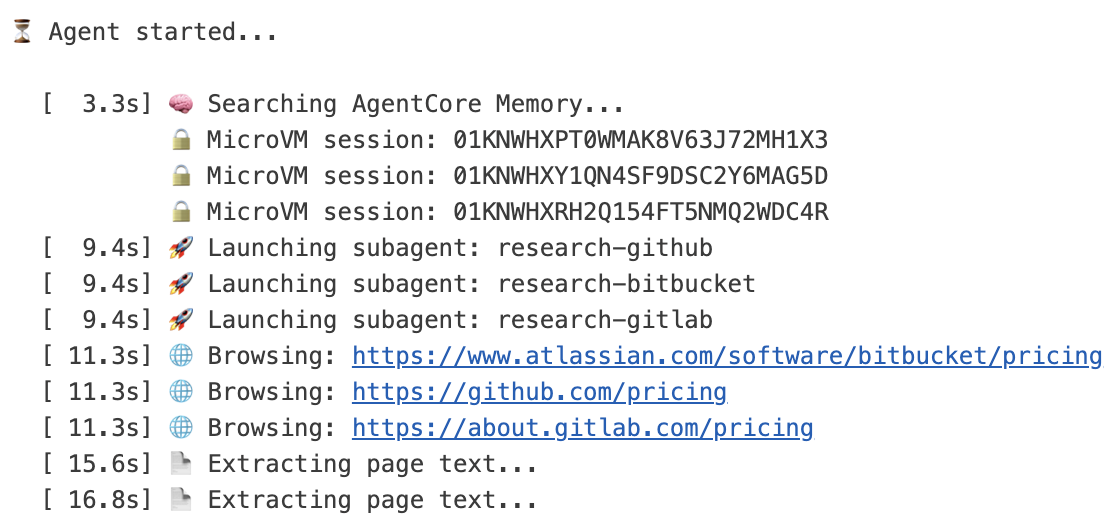
Figure 2:Three distinct MicroVM session IDs confirm that each research subagent operates in its own isolated Amazon Bedrock AgentCore Browser environment.
Step 3: Create the interpreter toolkit
The analyst subagent uses AgentCore Code Interpreter, an isolated MicroVM running a full Python environment with pandas, matplotlib, and numpy pre-installed:
The interpreter tools include execute_code, execute_command, write_files, read_files, list_files, upload_file, and install_packages. Need additional libraries? Use the install_packages tool to add them at runtime.
Step 4: Add cross-session memory (optional)
The coordinator agent can accumulate expertise over time with AgentCore Memory tools that interact with the long-term memory API directly:
Important:Your AgentCore Memory resource must have at least one extraction strategy configured (such as semanticMemoryStrategy) for long-term recall to work. Without strategies, create_event stores raw events but no insights are extracted for retrieval.
When the agent saves insights, AgentCore Memory’s configured strategies automatically extract structured knowledge in the background. On subsequent runs, the agent uses recall_past_research to search this extracted knowledge. It finds relevant facts and past findings without re-researching from scratch.
Step 5: Create and run the agent
Wire the components together and invoke the agent:
The runnable notebook with progress indicators and session display is available in the accompanying notebook. Expected runtime is 4–6 minutes with Claude Sonnet, reflecting real browser navigation time across three sites. Sequential processing of the same research would take up to 3x longer.
Trace and debug your agent
AgentCore Observability gives you visibility into this multi-agent architecture through Amazon CloudWatch. AgentCore emits traces and spans in OpenTelemetry (OTEL) format, so you can view the full orchestration hierarchy on the CloudWatch GenAI Observability page: the coordinator’s run at the top level, a child span for each research subagent, and the analyst subagent that follows. Within each span, you can review tool calls with their inputs, outputs, timing, and token usage, confirm that the research subagents ran concurrently from their wall-clock timing, and identify which subagent and tool call encountered an issue when a browser navigation or code run does not succeed. As a one-time setup per account, you enable CloudWatch Transaction Search before traces and spans become available. When you host the agent on AgentCore Runtime (Part 2), the runtime instruments your agent with OTEL automatically, so no additional configuration is needed. To run the same agent outside the runtime, add the AWS Distro for OpenTelemetry (ADOT) SDK and the LangChain instrumentation library to your agent. For more information, refer to the Amazon Bedrock AgentCore Observability documentation.
You can also score the quality of these traces with Amazon Bedrock AgentCore Evaluations, which provides built-in evaluators such as goal success rate and tool selection accuracy. For more details, refer to the AgentCore Evaluations documentation.
If you prefer, you can also use LangSmith for tracing. With LangSmith, you get end-to-end tracing that helps you debug this multi-agent architecture. Set three environment variables to turn on automatic tracing:
The accompanying notebook reviews this option.
Why this architecture matters
Now that you’ve seen how the components fit together, here’s why this pattern is valuable.
First, your coordinator stays focused on high-level reasoning. Each research subagent handles multi-step browsing internally and returns only a concise summary, keeping the coordinator’s context available for synthesis rather than filled with raw page content.
Second, you get clear separation between capabilities. Each subagent type accesses only its own tools, which reduces the chance of unintended tool usage and makes debugging more targeted.
Third, your research runs faster. Three browser research tasks run concurrently, each in its own AgentCore MicroVM, reducing wall-clock time compared to sequential processing.
Finally, Amazon Bedrock AgentCore is model-agnostic and framework-agnostic. The AgentCore tools (Browser, Interpreter, Memory) work identically regardless of which model orchestrates them. You can swap the model with a single line change:
Host the agent on AgentCore Runtime
The agent you built runs in a notebook, which works well for development. To move it to a managed endpoint with per-session isolation and a stable invocation ARN, you can host it on Amazon Bedrock AgentCore Runtime. AgentCore Runtime hosts your agent in an ARM64 container and runs each session in a dedicated microVM for up to 8 hours. Because it is framework-agnostic, your Deep Agents coordinator, the parallel browser subagents, and the analyst subagent all run unchanged.
The AgentCore CLI handles the deployment workflow in four steps: scaffold the project with agentcore create, update the template with your agent code, deploy with agentcore deploy, and invoke with agentcore invoke. After deployment, you can stream logs with agentcore logs and inspect traces with agentcore traces. When you are finished, agentcore remove all followed by agentcore deploy tears down all provisioned resources.
Part 2 of the notebook walks you through each of these steps, including prerequisites and IAM permissions.
Clean up
To avoid incurring charges, clean up the AgentCore resources you created:
Browser sessions auto-expire after 1 hour. Interpreter sessions auto-expire after 15 minutes. The accompanying notebook includes cleanup code that runs automatically. If you created an AgentCore Memory resource and no longer need it, you can delete it through the Amazon Bedrock AgentCore console or API.
Conclusion and next steps
In this post, you built a research agent that uses LangChain Deep Agents for orchestration, Amazon Bedrock AgentCore for isolated browser automation, code interpretation, and persistent memory. You deployed the agent to AgentCore Runtime using AgentCore CLI to run it as a managed service with per-session isolation, a stable endpoint, and built-in observability. This pattern of parallel data gathering, specialized processing, and synthesis applies to many workflows beyond competitive research:
- Due diligence:Configure subagents to research financial filings, press releases, and regulatory documents for a target company. For example, swap the competitor URLs for SEC EDGAR filing pages and reuse the same browser subagent pattern with minimal changes.
- Content creation:Use research subagents to gather source material while a writing subagent drafts sections
- Data pipeline orchestration:Have subagents extract data from different sources, then pass combined results to an analyst subagent for joins and transformations
To get started, open the accompanying notebook and follow the cell-by-cell walkthrough. If you have questions or feedback about this solution, leave a comment on this post. If you have questions or feedback about this solution, leave a comment on this post.
For more information about the services used in this post, refer to:
- LangChain Deep Agents documentation
- Amazon Bedrock AgentCore documentation
- Amazon Bedrock AgentCore pricing
- LangSmith documentation
- langchain-aws GitHub repository
- Getting started with Amazon Bedrock AgentCore

