

We are excited to announce the general availability of GPU partitioning with Amazon SageMaker HyperPod, using NVIDIA Multi-Instance GPU (MIG). With this capability you can run multiple tasks concurrently on a single GPU, minimizing wasted compute and memory resources that result from dedicating entire hardware (for example, entire GPUs) to tasks that can under-utilize the resources. By allowing more users and tasks to access GPU resources simultaneously, you can reduce development and deployment cycle times while supporting a diverse mix of workloads running in parallel on a single physical GPU, all without waiting for full GPU availability.
Data scientists run multiple lightweight tasks on reserved accelerated compute resources and need to drive efficient utilization for inference (for example, serving a language model), research (for example, model prototyping), and interactive tasks (for example, Jupyter notebooks for image classification experimentation). These tasks typically don’t require entire GPUs to run efficiently, let alone 8 GPUs. Cluster administrators want to enable cluster personas—data scientists, ML engineers, infrastructure teams—to run more workloads concurrently on the same GPUs, while preserving performance assurances and workload isolation boundaries, maximizing cluster-wide utilization, and maintaining full visibility into GPU compute and memory utilization.
In this post, we dive deep into how to set up and use MIG on SageMaker HyperPod, demonstrate practical examples for both inference and interactive workloads, and share best practices for maximizing the value of this new capability.
MIG in Amazon SageMaker HyperPod
In 2020, NVIDIA released NVIDIA Multi-Instance GPU (MIG), alongside the Ampere architecture that powers the NVIDIA A100 (for example: Amazon EC2 P4 – SageMaker ml.p4d.24xlarge instances) and NVIDIA A10G (Amazon EC2 G5) GPUs (note: G5 instances do not support MIG). With MIG, administrators can partition a single GPU into multiple smaller GPU units (called “MIG devices”). Each MIG partition operates as an independent, fully-isolated GPU instance with its own memory partition, cache, and compute cores. This isolation enables predictable performance and helps prevent resource conflicts between tasks.
With MIG support on Amazon SageMaker HyperPod, administrators can now maximize GPU utilization through flexible resource partitioning. This capability addresses key challenges with GPU resource management:
- Simplified set up management: Remove the complexity of scaling GPU partitions with simple-to-use setup across SageMaker HyperPod capabilities.
- Resource optimization: Partition powerful GPUs into right-sized partitions for smaller workloads, such as research experiments or small language model inference.
- Workload isolation: Run multiple independent tasks simultaneously with predictable performance, enabling multiple team members to work independently on the same GPU hardware while maintaining performance assurances and workload isolation.
- Cost efficiency: Maximize the value of GPU infrastructure by running multiple workloads concurrently instead of dedicating entire GPUs to smaller tasks.
- Observability: Track real-time performance metrics and resource utilization, optimizing task efficiency across GPU partitions.
- Quota management: Allocate fine-grained compute quota across teams, optimizing compute resource distribution.
“We have been using SageMaker HyperPod for over a year now, for a mix of inference and training. Partitioning GPUs with MIG technology for inference has allowed us to significantly increase the efficiency of our cluster, by maximizing the number of tasks we can run in parallel. It’s really helped us unlock the full potential of SageMaker HyperPod.”
– Arthur Hussey, Technical staff at Orbital Materials, a United Kingdom-based startup, who develops and runs AI models that can generate and simulate novel materials at scale.
MIG is useful when you want to allocate your higher-powered instances for use by multiple users or tasks in their respective isolated environments. For example, different teams within an organization can run their models concurrently on the same physical GPU, each with their own dedicated resources. This approach improves overall GPU utilization and efficiency, making it a cost-effective solution for organizations looking to maximize their GPU infrastructure investment. Some additional key use cases include:
- Resource-guided model serving: Organizations deploying multiple model versions (different sizes, quantization levels) can match each model to an appropriately sized MIG instance. A quantized 10B parameter model might run efficiently on a GPU partition, while a full-precision model needs a larger partition—both served from the same physical GPU with QoS assurances. Another example, as demonstrated below is the different hardware requirements even within a single inference cycle—the prefill phase requires more compute for the GEMMs for KV Cache calculations, whereas the decode phase may require more GPU memory (and memory bandwidth).
- Mixed workloads: Data science teams often need to run Jupyter notebooks for experimentation, batch inference pipelines, and occasional fine-tuning concurrently. MIG allows these diverse workloads—each with different resource requirements—to coexist on the same GPU without interference.
- Development and testing efficiency: CI/CD pipelines for ML models require isolated testing environments. MIG lets teams spin up multiple GPU instances for parallel model validation, smoke tests, and A/B testing frameworks without provisioning separate physical hardware for each test suite. This increases the iteration times for each deployment.
Architecture
In the following example architecture MIG is deployed on a SageMaker HyperPod EKS cluster of 16 ml.p5en.48xlarge instances. The cluster consists of three instance groups, each configured with different profiles. The cluster also uses the HyperPod Inference Operator to deploy models. MIG particularly shines in inference scenarios, providing predictable latency, flexibility in deployment, resource optimization and maximal GPU utilization, Quality of Service (QoS) assurances, and cost efficiency.

Deep dive: What is NVIDIA Multi-Instance GPU (MIG)?
Introduced by NVIDIA with the Ampere architecture, and refined in Hopper and Blackwell generations, MIG creates isolated partitions with dedicated streaming multiprocessors (SM), L2 cache slices, memory controllers, and DRAM address buses. A single GPU “instance” consists of GPU slices (smallest fraction of a GPU that combines a single GPU memory slice and a single GPU SM slice), and GPU engines (DMAs, NVDECs). To learn more about the terminology of what’s included within each GPU instance, check out MIG concepts.
Each GPU is partitioned using memory slices, thus providing a practical solution for dividing GPU resources effectively. MIG supports the partition of a single GPU into multiple separate instances, each with its own dedicated resources. This is particularly useful for workloads that don’t require the full power of a modern GPU, such as for generative AI inference tasks (for example, serving a small language model). The key advantage of MIG is its ability to provide consistent performance with hardware-level isolation. Each partition operates independently with its own allocated memory, computational cores, and SMs, making sure that workloads don’t interfere with each other. This static allocation means that resources assigned to one instance remain dedicated to that instance, to facilitate predictable performance and reliable resource management.
Understanding the different MIG partitions
A MIG device consists of a single GPU “instance” and a single Compute “instance.” Each GPU instance (GI) can also be further sub-divided into multiple Compute Instances (CI) as required by users. For example, with a ml.p5en.48xlarge instance, we can run the following find_MIG_profiles.yaml file to find the available profiles per H200 GPU:
This output lists the profiles available to you. These flexible MIG profiles supports a wide range of deployment scenarios, each optimized for different workload requirements and resource needs.
If we look at one of the profiles (say for example 4g.71gb):
4g: represents the GI profile compute. This includes SM resources.71gb: represents the GI profile memory.
So in this case, we choose profile 4g each with 71gb of GPU memory!
Understanding MIG on Kubernetes
SageMaker HyperPod uses custom labels and the NVIDIA GPU Operator to manage MIG functionality on Kubernetes (using Amazon EKS). The GPU Operator uses the Kubernetes operator framework to automate the deployment and management of NVIDIA software components needed for GPU orchestration, with the NVIDIA MIG Manager being a necessary component for MIG support. This installation is done in addition to the deployments, helm charts, and DaemonSets already installed by the HyperPodHelmCharts.
MIG on HyperPod EKS works through a label-based approach. The MIG Manager, running as a Kubernetes DaemonSet , monitors nodes for specific MIG configuration labels. When these labels are detected, it automatically configures the appropriate MIG partitions using MIG-parted. With the managed experience (see more in the following section), this process is further simplified—MIG configurations are managed at the instance group level, with HyperPod automatically handling the necessary node labeling and configuration.
MIG support on SageMaker HyperPod
Beyond these core MIG capabilities, SageMaker HyperPod helps enhance the MIG experience with its built-in enterprise features. The HyperPod resiliency features automatically monitor cluster health, detects and replaces faulty hardware, and resumes workloads from checkpoints without manual intervention. HyperPod task governance provides fine-grained control over MIG resource allocation across teams, with automatic handling of priority-based resource reallocation. Additionally, comprehensive one-click observability in HyperPod dashboards give administrators full visibility into MIG instance utilization, performance metrics, and resource allocation trends across the partitions. These capabilities help organizations manage their MIG enabled clusters with enterprise-grade reliability, control, and transparency.
Solution overview
Before setting up MIG on your SageMaker HyperPod EKS cluster, verify you have the following:
- A SageMaker HyperPod cluster with Amazon EKS as the orchestrator. If you haven’t created one yet, refer to Creating a SageMaker HyperPod cluster with Amazon EKS orchestration to set up a HyperPod cluster.
- By default, the installation of the GPU Operator (more details in the following section) is optional if you set up the cluster using either the Quick setup or Custom setup.
- Review the “Experience 1” section on configuring a HyperPod EKS cluster with the MIG manager pre-installed.
- If you didn’t enable MIG during cluster setup, don’t worry! The sections below also describe how you can set this up on an existing cluster.
- By default, the installation of the GPU Operator (more details in the following section) is optional if you set up the cluster using either the Quick setup or Custom setup.
- Supported instance available for you to use. For more information on the supported GPU instances, refer to Supported MIG Profiles, and EC2 Accelerated Computing. You may use a Flexible Training Plan for this too.
- Appropriate IAM permissions for cluster management and MIG configuration. To learn more about the permissions required, refer to AWS Identity and Access Management for SageMaker HyperPod.
Setting up MIG on your HyperPod cluster
In this section, we detail how you can set up MIG support on your SageMaker HyperPod cluster. There are two experiences supported:
- Managed MIG experience
- DIY experience
The do-it-yourself (DIY) solution uses the Kubernetes command-line client kubectl, and a managed solution with Custom Labels is for easy configuration and application of GPU partition labels. The DIY approach operates at the instance level, while the managed solution operates at the instance group level.
Experience 1: Managed MIG experience (Recommended)
The managed MIG experience allows you to configure MIG on your HyperPod instance groups. You use an AWS managed ConfigMap that is automatically set up using the AWS Managed GPU Operator installation on your HyperPod cluster. This experience can be implemented directly using the console (during the cluster set up, or by using add-ons), or using the UpdateCluster API—with the help of Custom Labels.
Setting up new clusters
In this example, we set up a HyperPod EKS cluster using the AWS Management Console. On your SageMaker console, navigate to HyperPod Clusters, and choose Create HyperPod cluster. Select Orchestrated by Amazon EKS.
MIG is an optional configuration, so as of launch, it is not enabled by default in the Quick setup section. To use the managed MIG experience, choose the Custom setup radio button.
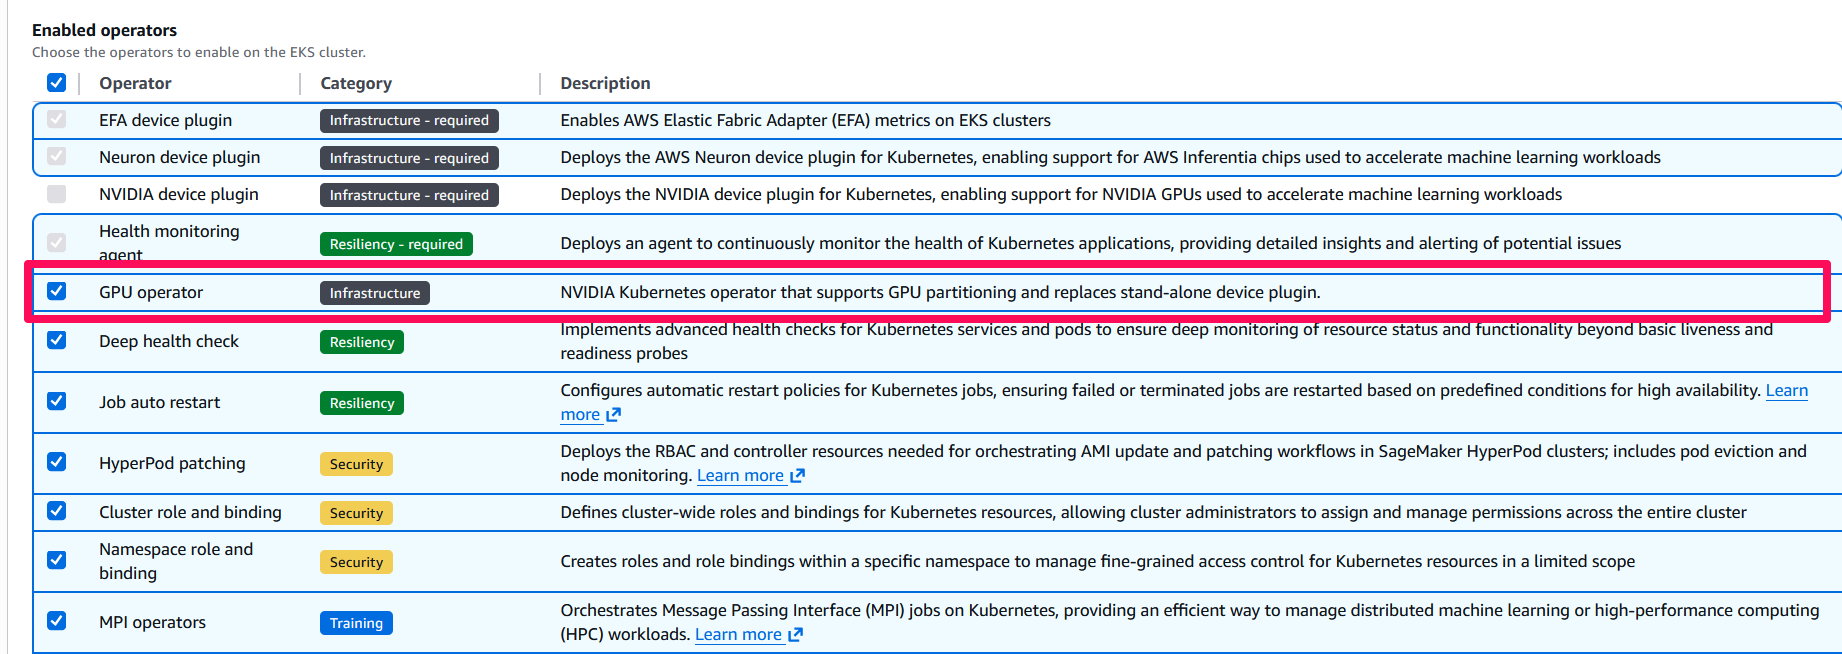
In Custom setup, under Orchestration, check the box for GPU Operator. Checking the GPU Operator box automatically de-selects the NVIDIA device plugin box. The NVIDIA GPU Operator installation bundles with the installation of the Device Plugin, and so this verifies that there are no double-installations or downstream dependency errors.
Next, you can configure your instance groups. This post doesn’t cover all the details of the instance group, except the partition configuration.
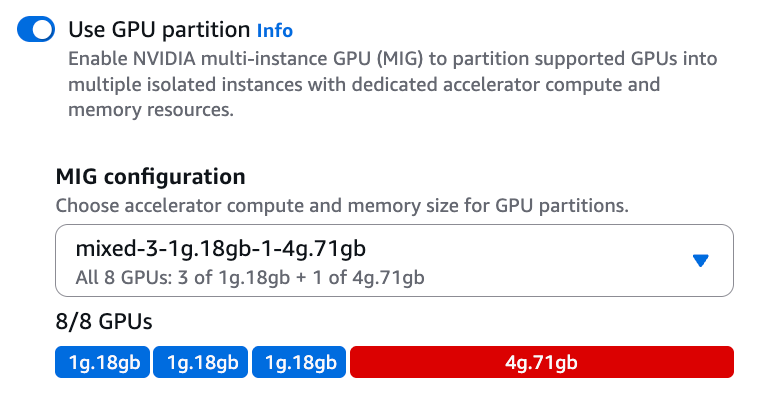
In your instance group configuration, under Advanced configuration, turn on Use GPU partition. This setting is applied at the instance group level: the instances within this instance group will have partitioned GPUs. You can choose the MIG configuration you’d like. The configurations are organized into different partition categories:
- Low compute tasks for lightweight tasks that aren’t very compute intensive, such as running multiple iterative decodes.
- High compute tasks for tasks that require compute or SM power, such as matrix multiplications (GEMM) for LLM prefill.
- Mixed tasks for running different types of tasks, such as lightweight interactive development tasks alongside several inference tasks, simultaneously on a single GPU to maximize resource efficiency
One important note is that equal-sized partitions divide each of your GPUs into the partitions of the same type, whereas mixed partitions allow you to have different partitions on your GPUs. Please refer to the Understanding the different MIG partitions section above to understand MIG partitions, including what resources are split per partition.
For example, if you choose the mixed-3-1g.18gb-1-4g.71gb profile, you get (within a single GPU):
- 3 GPU instances, each with the
1gGPU instance profile for compute, and18gbof HBM3e GPU memory - 1 GPU instance with the
3gGPU instance profile for compute, and71gbof HBM3e GPU memory - The UI will also display a visual depiction of how the GPUs are partitioned for your reference:
 |
You can set up the rest of the cluster as you like. This post doesn’t cover the other segments of the cluster. For the rest of this post, unless otherwise stated, you may assume that we use a ml.p5en.48xlarge instance with the MIG configuration stated previously.
Once the cluster is InService, and your compute is in an Active state within your cluster, you may connect to your cluster. For more information on that, check out these instructions.
If you run aws sagemaker describe-cluster --cluster-name $CLUSTER_NAME :
Specifically, notice the new KubernetesConfig parameter. That’s where we can set MIG labels at the instance group level (using UpdateCluster).
You can also verify that MIG was setup correctly on your cluster by checking the MIG pods’ output:
This command confirms that the MIG manager is running. However, the success of MIG partitioning is reflected in the instance status, where MIG.status is translated to the instance status. You can observe how the status transitions from “MIG partitioning in progress” to “Running,” and how errors are propagated through APIs and the console.
Setting up MIG on existing clusters
If you have an existing HyperPod cluster without MIG support, you can enable it using the HyperPodHelmCharts. This provides a streamlined installation process that handles the deployment of the necessary components, including the NVIDIA GPU Operator and MIG manager.
Install the MIG manager components using the following command:
Again, you can verify the installation using a similar approach as the previous section.
Managing MIG configurations
There are two approaches to managing MIG configurations on your HyperPod cluster: instance group level management through the UpdateCluster API and Custom Labels, and individual instance management using Kubernetes labels.
Instance group level management
The UpdateCluster API enables you to configure MIG profiles for the instances within an instance group:
This configuration:
- Applies to the instances in
MIG-group - Sets up mixed MIG profiles on each GPU
- Creates both
1g.18gband4g.71gbpartitions
Individual instance management
For more granular control within an instance group, you can manage MIG configurations at the individual instance level using Kubernetes labels. To enable MIG on a specific instance, you can run the following command: kubectl label node $NODE nvidia.com/MIG.config=mixed-3-1g.18gb-1-4g.71gb --overwrite
If you are using the default ConfigMaps (more on the ConfigMaps in the following Additional configuration details section, you can also remove MIG from an instance as follows:
kubectl label node $NODE nvidia.com/MIG.congif=all-disabled --overwrite
To verify whether the current MIG configuration of an instance, you can run the following command:
kubectl describe node $NODE | grep "nvidia.com/MIG.*count"
You may also use the HyperPod CLI, a command line tool that helps manage clusters, training jobs, and inference endpoints on the SageMaker HyperPod clusters orchestrated by Amazon EKS, as follows:
hyp list-accelerator-partition-type
While you can use kubectl label node to quickly enable MIG on a node to test, this approach requires careful consideration, because your MIG configuration could be lost in case a node is replaced. If you want persistent MIG configurations, consider using the managed instance group approach, or refer to the following ConfigMap management section on setting up persistent ConfigMaps.
Experience 2: DIY experience
While the managed experience is recommended, you can also set up MIG support manually using the NVIDIA GPU Operator. This approach provides foundational MIG functionality through direct interaction with Kubernetes components.
You can install directly from the instructions on the NVIDIA GPU Operator GitHub page. Verify that you set the devicePlugin.enabled flag to false, since the HyperPodHelmCharts install this for you as part of the cluster set up process.
Key configuration parameters:
- MIG.strategy=mixed: Enables mixed MIG profiles on GPUs.
- If in the future you’d like to change between single and mixed, you can patch the cluster policy:
devicePlugin.enabled=false: Helps prevent conflicts with the HyperPod default device plugin installationMIGManager.enabled=true: Enables the MIG manager componentMIGManager.WITH_REBOOT=true: Allows node reboots for MIG configuration changes
Unlike the managed experience (which is recommended), this cannot be configured at the instance group level. This means that you will need to use Kubernetes labels to manage the MIG lifecycle.
While both approaches are supported, the managed experience is recommended, as it integrates seamlessly with enterprise features of SageMaker HyperPod like HyperPod task governance, Karpenter based autoscaling, and one-click observability. For users currently using the DIY setup, migration to the managed experience is straightforward, using the steps outlined in the sub-sections above so that you can take full advantage of the automation and management capabilities available in SageMaker HyperPod.
To migrate to the managed experience, you can:
- Remove the DIY installation:
helm uninstall gpu-operator -n gpu-operator
- Install the managed components using the HyperPod CLI (see Setting up MIG on existing clusters).
The managed experience provides additional benefits, including:
- Instance group level configuration
- Integration with the features of HyperPod (such as autoscaling)
- Simplified administration through HyperPod APIs, and a HyperPod managed CRD that is up-to-date
Additional configuration details
The following sections include additional details that could be helpful to you as you navigate MIG support on your SageMaker HyperPod cluster.
Available MIG profiles
In addition to running the nvidia-smi commands (or the provided find_MIG_profiles.yaml manifest), you can find a comprehensive list of supported MIG partitions and their specifications across different GPU architectures (including Ampere, Hopper, and Blackwell) in NVIDIA’s official MIG documentation.
ConfigMap management
Both DIY and managed MIG implementations use Kubernetes ConfigMaps to define available MIG profiles. You can view the default configurations using:
The NVIDIA default configuration (default-MIG-parted-config) includes only single-partition profiles by default, while the AWS managed configuration (default-MIG-config) includes both single and mixed profiles out of the box.
If you need a profile that isn’t included in the default configurations, you can create a custom ConfigMap.
Verify that the custom profile you are configuring is supported (refer to the Available MIG profiles section).
To use your custom configuration, apply the ConfigMap and update the MIG manager to use your custom config:
Instead of using the default-MIG-parted-config (or default-MIG-config for the managed installation), you are pointing the MIG manager to your custom ConfigMap. This means that the MIG manager will now only see the profiles that you’ve set in this ConfigMap, so proceed with caution.
MIG operations guide
The following are some useful commands to configure and manage the lifecycle of MIG on your SageMaker HyperPod cluster. Enable MIG with a specific profile:
Disable MIG:
Profile verification:
Monitor MIG components:
Verify GPU partitioning:
Hands-on examples
To demonstrate these concepts in action, let’s explore some practical examples: We’ll show how to run concurrent inference workloads using MIG partitions, showcasing the benefits of resource isolation and parallel deployment. Then, we will demonstrate setting up interactive development environments (JupyterLab notebooks), each with access to only the GIs assigned to them, illustrating how data scientists can efficiently share GPU resources for experimentation and development. This section is optional.
For the examples below, we will use the same cluster with one ml.p5en.48xlarge, with the following MIG profile: mixed-3-1g.18gb-1-4g.71gb.
Running concurrent workloads with MIG
In this section, we will demonstrate how MIG support on SageMaker HyperPod enables efficient resource utilization across different ML workload types. We’ll use the same pre-configured HyperPod EKS cluster with an instance group with only one ml.p5en.48xlarge instance. The instance is configured with the following MIG profile:
Note: Please consider your SLAs and customer needs for your deployments. The examples shown below are to be considered only as an example.
We’ll demonstrate three distinct workload types running concurrently on the same instance to showcase the flexibility of MIG:
- Inference operator deployment: Deploy a model from SageMaker JumpStart
- NVIDIA Dynamo deployment: Implement disaggregated inference with separate prefill and decode phases
- Interactive deployment: Run a Jupyter Notebook environment on a MIG partition
In addition to deployments, we talk through integrations with HyperPod one-click observability dashboards and HyperPod task governance, which provide detailed insights into MIG partition utilization, and allow you to optimize cluster utilization respectively.
Workload 1: SageMaker HyperPod Inference Operator
The SageMaker HyperPod Inference Operator provides a streamlined, production-ready solution for deploying inference workloads on your HyperPod cluster. As a fully managed component, it handles the complexities of model deployment, scaling, and monitoring while seamlessly integrating with MIG for optimal resource utilization.
With MIG support, the Inference Operator intelligently maps model deployments to appropriately sized GPU partitions, enabling efficient multi-model serving on a single GPU. This integration delivers several key benefits:
- Resource optimization: Deploy multiple models across MIG partitions based on their computational needs
- Workload isolation: Facilitate consistent performance with hardware-level isolation between model endpoints
- Automated management: Use built-in scaling and monitoring capabilities in HyperPod
- Enterprise-grade reliability: Benefit from automatic fault detection and recovery
- Simplified operations: Manage deployments through familiar Kubernetes interfaces
In this example, we’ll deploy the DeepSeek-R1-Distill-Qwen-1.5B model, an efficient distilled model that demonstrates strong reasoning capabilities while being compact enough to run on smaller MIG partitions. We’ll use the JumpStartModels Kubernetes Custom Resource Definition (CRD), which simplifies deployment of pre-built models from SageMaker JumpStart.
The inference operator also allows you to deploy models from Amazon S3. However, in this example we’ll focus on only the JumpStartModels CRD.
Create a deployment manifest that specifies the model and the MIG configuration:
You can monitor the status of the deployment:kubectl describe jumpstartmodel -n ds-model-deployment deepseek-jumpstartA successful deployment will show:
Once deployed, you can invoke the model through either the SageMaker endpoint, or the Application Load Balancer (ALB), both of which are auto deployed by the SageMaker HyperPod Inference Operator. Here’s an example of using the SageMaker endpoint:
An example output looks like:
Instead of using native Kubernetes manifests and CRDs, you may also opt to use the HyperPod CLI. An example command for a JumpStart deployment looks like:
The HyperPod Inference Operator, through HyperPod Autoscaling (Kubernetes Event Driven Autoscaling), also allows you to scale your deployment. For example, you may scale your deployment up to use multiple MIG profiles (same deployment) to handle demand from your end users. Here’s an example manifest that you may use with KEDA Autoscaling to scale up to 16 replicas. In addition to scaling, the HyperPod Inference Operator also supports Intelligent request Routing, and KV cache with MIG.
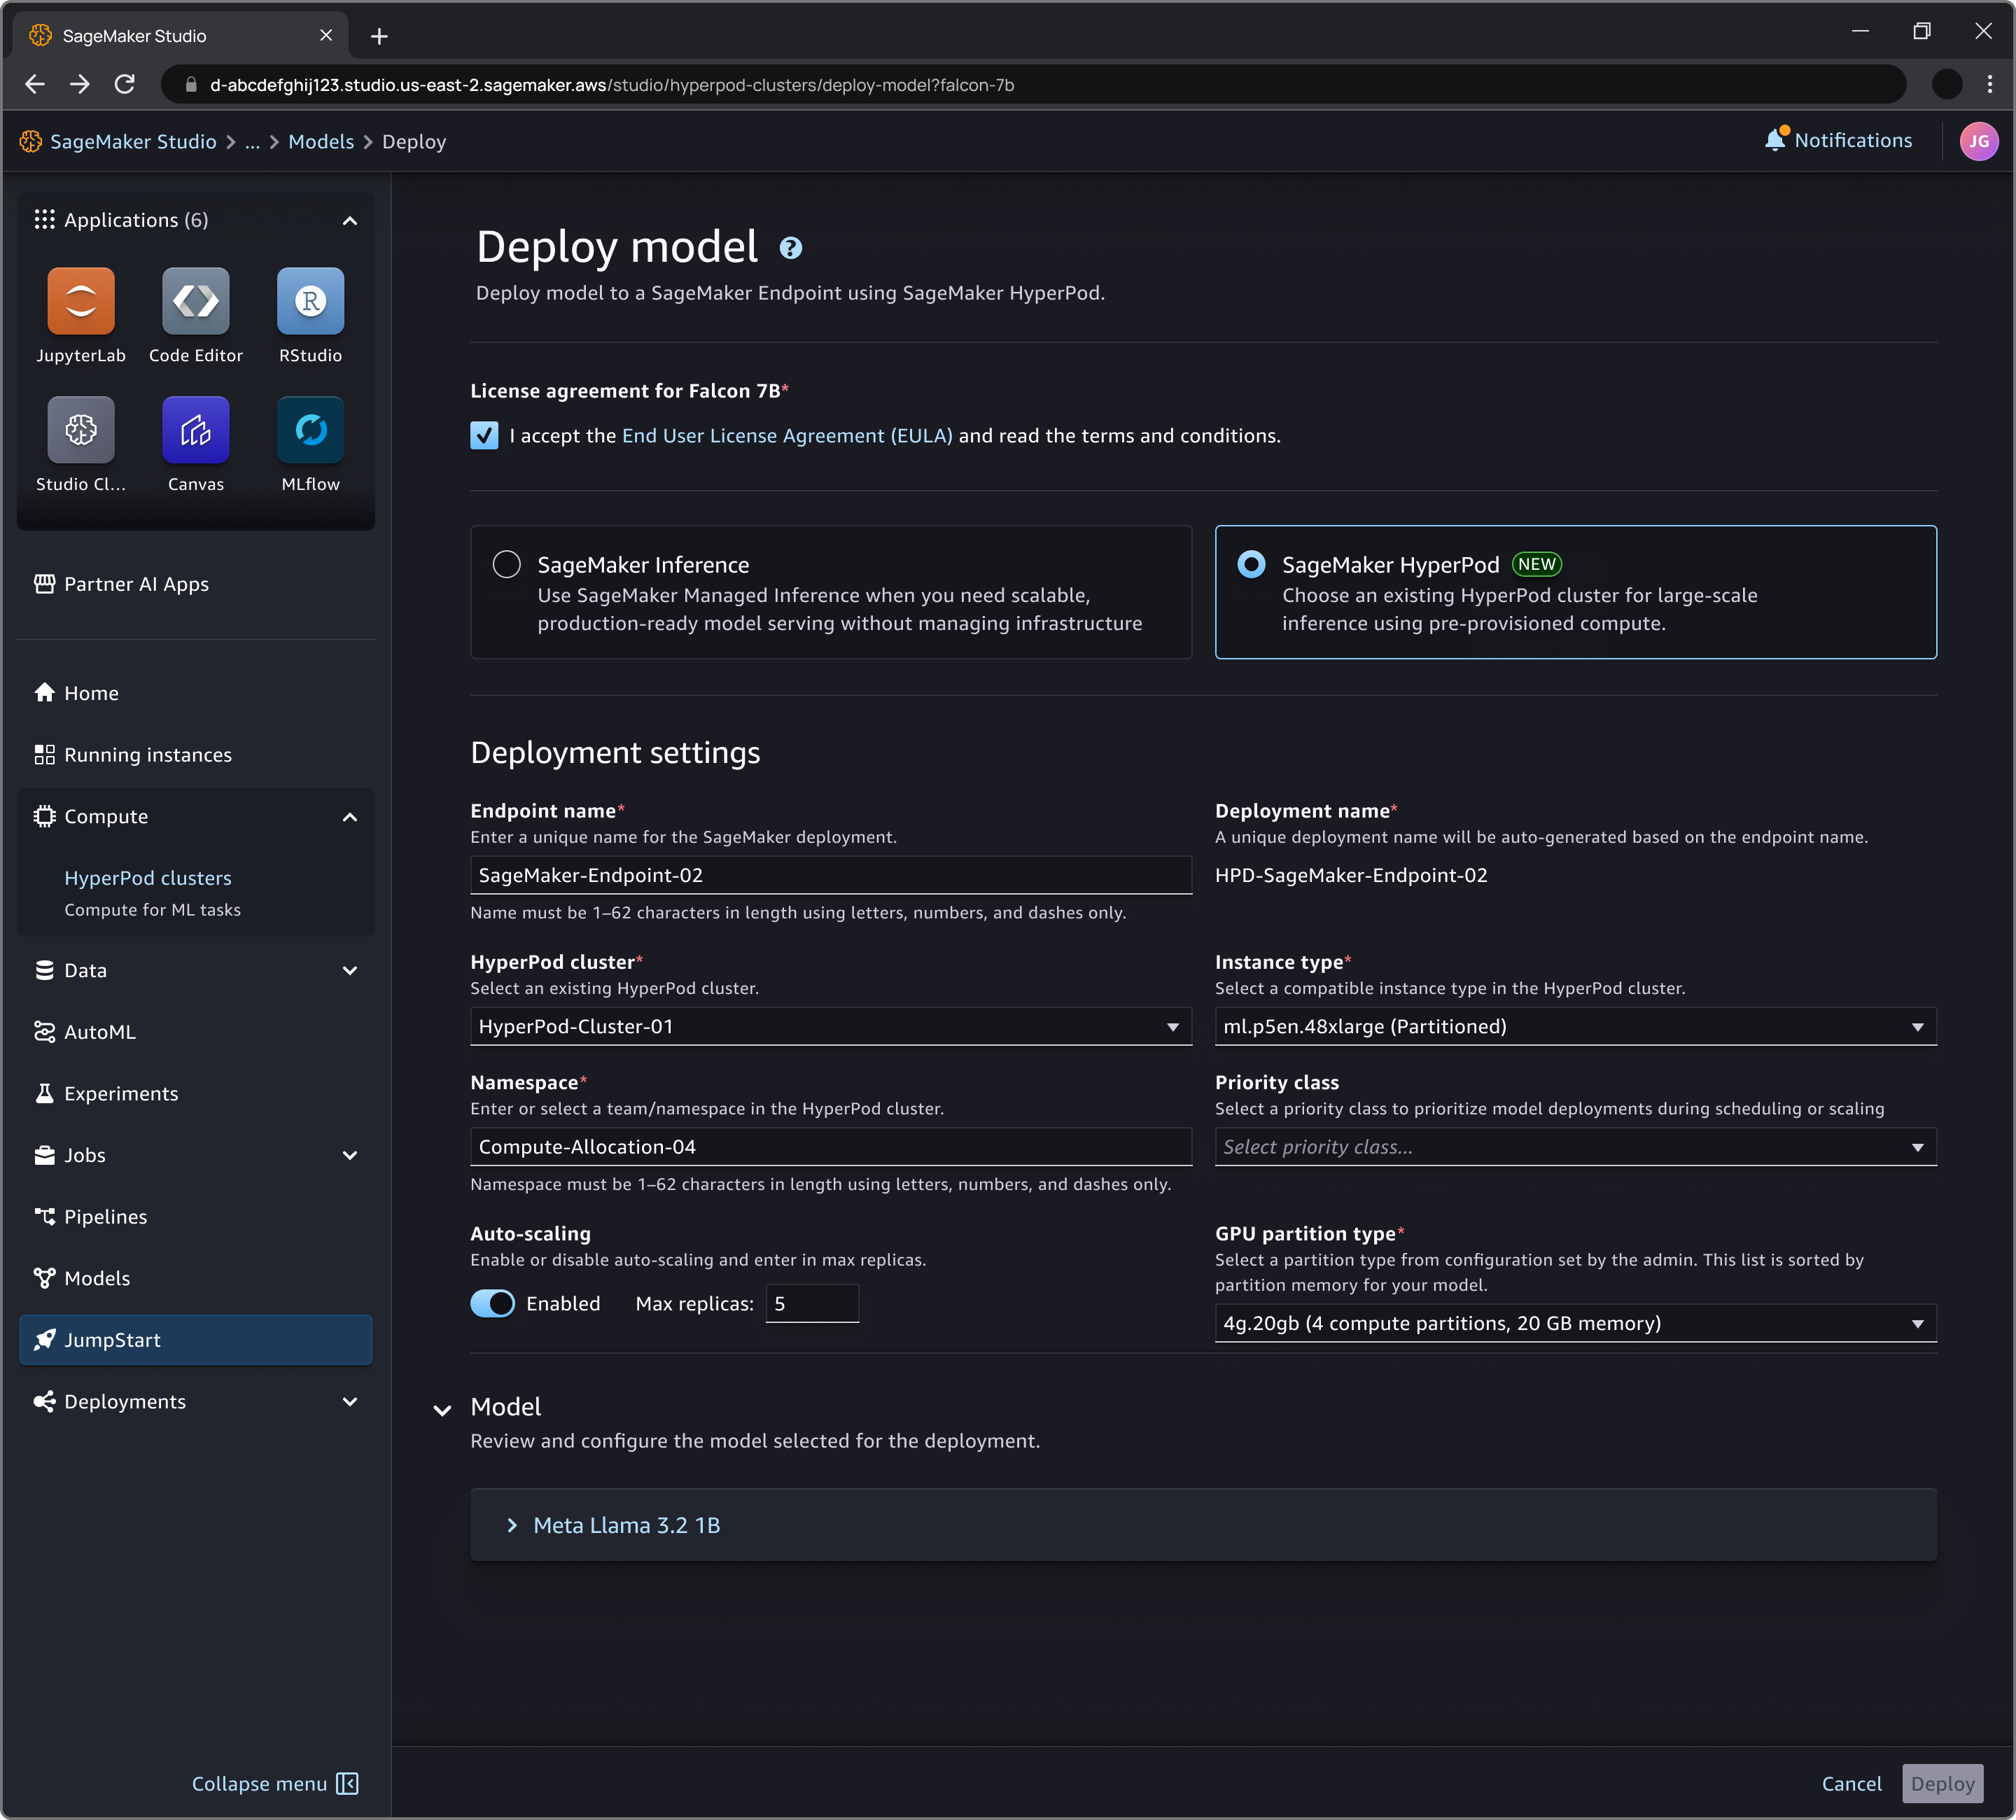
You can also deploy your JumpStart model directly from SageMaker AI Studio, as shown in the following screenshot:
The following is a depiction of 3 distinct workloads running on one instance. The first workload is a dynamically scaling deployment of the deepseek-llm-r1-distill-qwen-1-5b model, handled by the HyperPod Inference Operator. The second workload is a static deployment (disaggregated across two MIG profiles) of the Qwen3-0.6B model, and the last one shows Jupyter notebooks popping up based on requests from data scientists.

Workload 2: Static deployment of Qwen3-0.6B for internal users
The second workload we deploy on our ml.p5en.48xlarge instance for demonstration purposes is a static deployment of the Qwen3-0.6B model. This is a static deployment for internal users only, and we utilize an open source server, that supports disaggregated inference.
LLM inference consists of two distinct phases with different computational characteristics. The prefill phase processes the input prompt to generate the KV cache. This process involves a lot of matrix multiplications, and is therefore compute-intensive (require access to more SMs). On the other hand, the decode phase is a lot more memory/bandwidth/IO intensive, since it generates tokens sequentially (requires sufficient memory for KV cache storage). This distinct resource profile makes disaggregated inference particularly well-suited for MIG deployments. By matching each phase to appropriately sized MIG partitions, we can optimize resource utilization:
- Prefill workers: Larger partitions (4g.71gb) with more SMs for compute-intensive operations
- Decode workers: Smaller partitions (1g.18gb) with sufficient memory but fewer SMs
Using vLLM as our backend, we’ll demonstrate how to configure this custom deployment on HyperPod. For this sample, we deploy the Qwen/Qwen3-0.6B model. We follow the deployment instructions from NVIDIA’s and vLLM’s documentation (1, 2, 3).
You can use the following disagg.yaml file targeted to use the MIG profiles on our instance.
This deployment creates:
- One frontend service for request routing
- Two decode workers using
1g.18gbMIG partitions for efficient token generation - One prefill worker using a
4g.71gbMIG partition for compute-intensive prompt processing
To understand the CRDs used by NVIDIA (DynamoGraphDeployments), refer to Understanding Dynamo’s Custom Resources. You can invoke the model through the frontend service (using port-forwarding)
An output would look like:
Note that this is just an example and it is not meant to be a production workload. In addition to considering your SLAs, please configure your ALB with an HTTPS listener and a TLS certificate. This sample uses HTTP for simplicity. Additionally, the hf-token-secret in this sample is stored as an environment variable (and by extension, in your terminal history). We recommend encrypting your Kubernetes secrets using AWS KMS.
Workload 3: Interactive workloads on a Jupyter notebook
The final example demonstrates how data scientists can leverage MIG partitions for interactive development environments. We’ll create a development space using one of our 1g.18gb partitions, providing dedicated GPU resources for experimentation and development while maintaining isolation from other workloads. This blog post assumes that you’ve set up the space operator. For more information on how to do that, refer to this documentation.
Let’s create a space manifest using the nvidia.com/MIG-1g.18gb MIG profile.
You can deploy the space usingkubectl apply -f space.yamlYou may also use the HyperPod CLI to create this space:
Once the space is running, you can access it through port forwarding:kubectl port-forward service/data-scientist-space-MIG-service 8888:8888
You should also see this space running on your console. Once on your notebook, you can run nvidia-smi -L or just nvidia-smi to show you your allocated GPU (partition):
This setup provides data scientists with:
- Dedicated GPU resources for development
- Isolation from production workloads
- Access to familiar Jupyter environments
- Efficient resource utilization through MIG partitioning
The same approach can be used to support multiple developers, each with their own isolated MIG partition, maximizing the utility of your GPU infrastructure while maintaining performance assurances.
Now that the three workloads are running concurrently on different MIG partitions, we can see the power of MIG-enabled resource sharing:
SageMaker HyperPod Observability
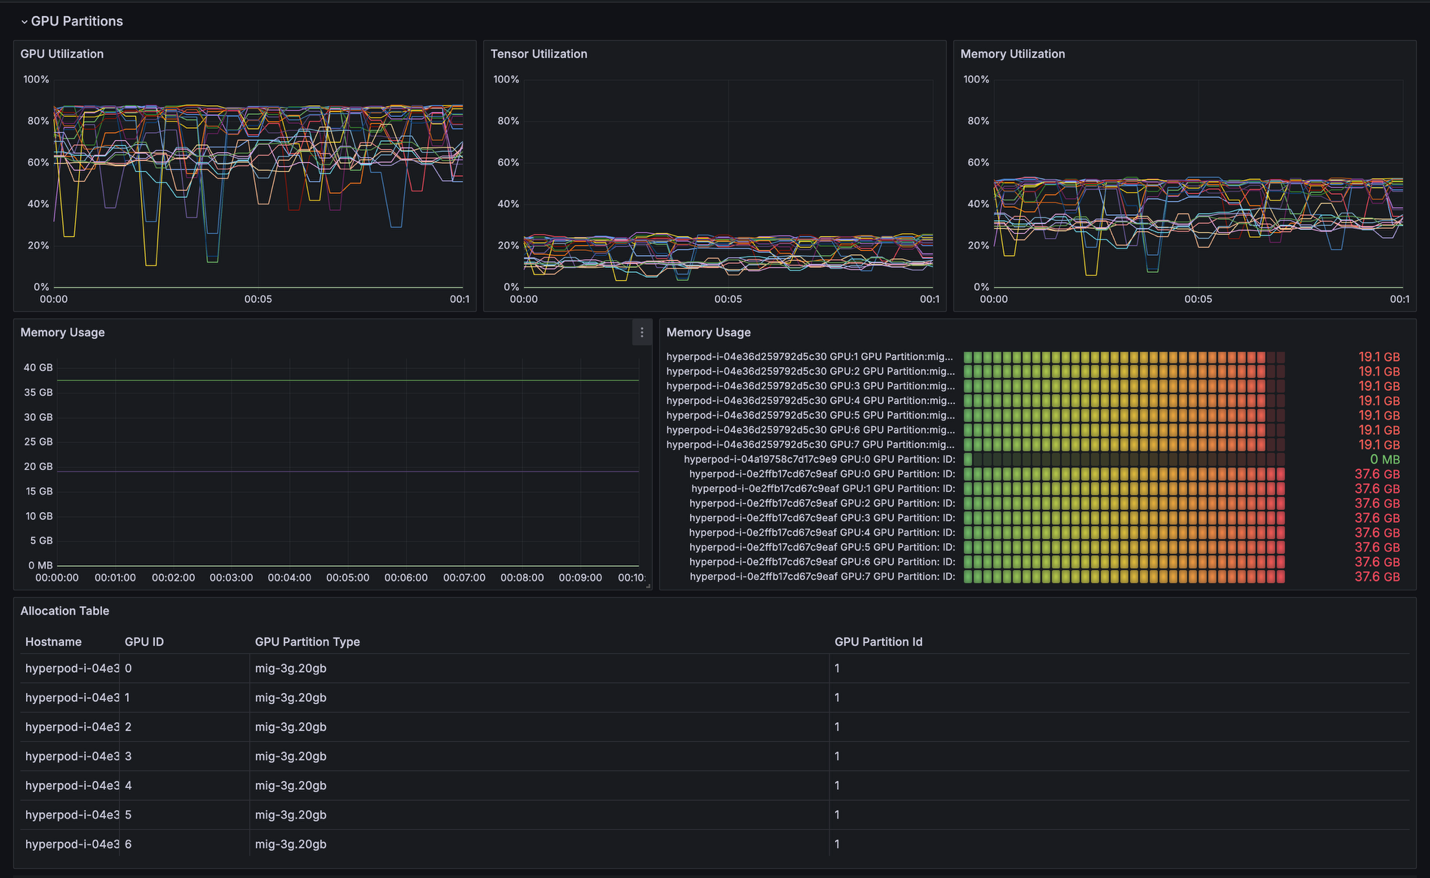
One-click observability in HyperPod provides comprehensive insights into MIG partition utilization through pre-configured Grafana dashboards. These dashboards offer:
- Real-time monitoring of GPU utilization per MIG partition
- Memory usage tracking across different workloads
- Resource allocation visualization
- Performance metrics for inference endpoints
- Automated alerts for resource constraints
The following is an example of the observability dashboard that displays partition usage.
SageMaker HyperPod task governance
With SageMaker HyperPod task governance, customers can optimize Amazon SageMaker HyperPod cluster utilization on Amazon Elastic Kubernetes Service (Amazon EKS), distribute fair usage, and support efficient resource allocation across different teams or projects.
As with existing functionality, you can enable task prioritization and fair-share resource allocation through cluster policies that prioritize critical workloads and distribute idle compute across teams. By using HyperPod task governance, you can define queue admission policies (first-come-first-serve by default or task ranking) and idle compute allocation methods (first-come-first-serve or fair-share by default). In the Compute quota allocation policy, you can create and edit allocations to distribute resources among teams, enable lending and borrowing of idle compute, configure preemption of low-priority tasks, and assign fair-share weights.
The key innovation is in the ComputeQuotaResourceConfig, where you’ll now find fine-grained options for resource allocation. In addition to the existing instance-level quotas, GPU-level quota, you can now directly specify MIG partition quotas by instance type and family or by hardware type. When you define GPU allocations, HyperPod task governance intelligently calculates appropriate default values for vCPUs and memory which are set proportionally. You can change default values based on your needs.
These hands-on examples demonstrate how MIG support on SageMaker HyperPod supports efficient resource sharing across different workload types. Through hardware-level isolation and flexible resource partitioning, organizations can maximize their GPU infrastructure investment while maintaining workload performance and reliability. The integration with the comprehensive feature set of HyperPod provides end-to-end support for ML operations:
- Managed inference capabilities
- HyperPod Inference Operator to streamline model deployment and serving
- Auto scaling capabilities on HyperPod to adapt to changing workload demands
- SageMaker HyperPod observability to gain deep insights into resource utilization
- HyperPod task governance to facilitate optimal resource allocation and workload prioritization
- HyperPod training operator to manage distributed training workloads
- Health monitoring and resilience
- Deep health checks to check the reliability and stability of the SageMaker HyperPod clusters
- Automated monitoring and remediation to maintain system health
Clean up
If you followed along with the blog, and would like instructions on cleaning up your resources, refer to Deleting a SageMaker HyperPod cluster.
Conclusion
In this post, we introduced Multi-Instance GPU (MIG) support for Amazon SageMaker HyperPod, a powerful capability that enables organizations to maximize their GPU infrastructure investment through flexible resource partitioning. By running multiple isolated tasks concurrently on a single GPU, MIG addresses key challenges in ML infrastructure management, from cost optimization to resource utilization.
With the SageMaker HyperPod managed MIG experience, you can:
- Optimize GPU utilization by running multiple workloads concurrently
- Enable predictable performance through hardware-level isolation
- Scale ML operations efficiently across teams and workloads
- Reduce infrastructure costs by right-sizing GPU resources
- Maintain enterprise-grade security and governance
The integration of MIG with the existing features of HyperPod—including task governance, observability, and automated resiliency—provides a comprehensive solution for managing complex ML tasks at scale. If you’re serving multiple inference endpoints, supporting development teams, performing scientific research, or optimizing training or reinforcement learning workflows, MIG on SageMaker HyperPod offers the flexibility and control needed to meet your organization’s ML infrastructure needs while reducing development costs, and increasing aggregate resource utilization.
To get started with MIG on SageMaker HyperPod, visit the SageMaker HyperPod documentation or explore our hands-on workshop. For more information about SageMaker HyperPod and its features, check out SageMaker HyperPod.
A special thanks to our colleagues Giuseppe Angelo Porcelli (Principal Machine Learning Specialist SA), Marta Aleszewicz (Sr. SDE), Ashish Sharma (Sr. SDE), Satish Gollaprolu (SDE), Shantanu Tripathi (SDE), Yun-Chi Chen (UX Designer) and others on the SageMaker AI team for their support in the launch of this capability.
About the authors
 Aman Shanbhag is a Specialist Solutions Architect on the ML Frameworks team at Amazon Web Services (AWS), where he helps customers and partners with deploying ML training and inference solutions at scale. Before joining AWS, Aman graduated from Rice University with degrees in computer science, mathematics, and entrepreneurship.
 Siamak Nariman is a Senior Product Manager at AWS. He is focused on AI/ML technology, ML model management, and ML governance to improve overall organizational efficiency and productivity. He has extensive experience automating processes and deploying various technologies.
 Anoop Saha is a Sr GTM Specialist at Amazon Web Services (AWS) focusing on generative AI model training and inference. He partners with top frontier model builders, strategic customers, and AWS service teams to enable distributed training and inference at scale on AWS and lead joint GTM motions. Before AWS, Anoop held several leadership roles at startups and large corporations, primarily focusing on silicon and system architecture of AI infrastructure.
 Ankit Anand is a Principal Foundation Models Go-To-Market (GTM) Specialist at AWS. He partners with top generative AI model builders, strategic customers, and AWS Service Teams to enable the next generation of AI/ML workloads on AWS. Ankit’s experience includes product management expertise within the financial services industry for high-frequency/low-latency trading and business development for Amazon Alexa.
 Sivashankar, Software Engineering Manager at Amazon Web Services (AWS), leads a team in HyperPod that’s responsible for HyperPod Task Governance, Fractional GPU, and SageMaker Clarify. Sivashankar has extensive experience in AWS leading EKS control plane services and Amazon MQ for RabbitMQ and a long career at Microsoft, where he helped shape Microsoft 365 experiences.
 Pradeep Cruz is a Senior SDM at Amazon Web Services (AWS), driving AI infrastructure and applications at enterprise scale. Leading cross-functional organizations at Amazon SageMaker AI, he has built and scaled multiple high-impact services for enterprise customers including SageMaker HyperPod-EKS Inference, Task Governance, Feature Store, AIOps, and JumpStart Model Hub at AWS, alongside enterprise AI systems at T-Mobile and Ericsson. His technical depth spans distributed systems, GenAI/ML, Kubernetes, cloud computing, and full-stack software development.

