
You sign up (free tier available), build your companion by customizing traits and looks, then jump into chat.
The Ourdream AI chat flows based on your selections and memory history. If you subscribe, you unlock media generation-creating images and short videos of your companion based on chat context or manual prompts.
The interface is straightforward: pick, chat, generate. Just keep in mind premium features require DreamCoins or subscription upgrade.
How to Create AI Girlfriend with Ourdream AI?
Here’s a practical, step-by-step guide to creating an AI girlfriend in 6-steps shown in the screenshots. I’ll walk you through every control you can see, plus tips to get consistent, great-looking results. Let’s go!
1) Style – choose presentation and art style
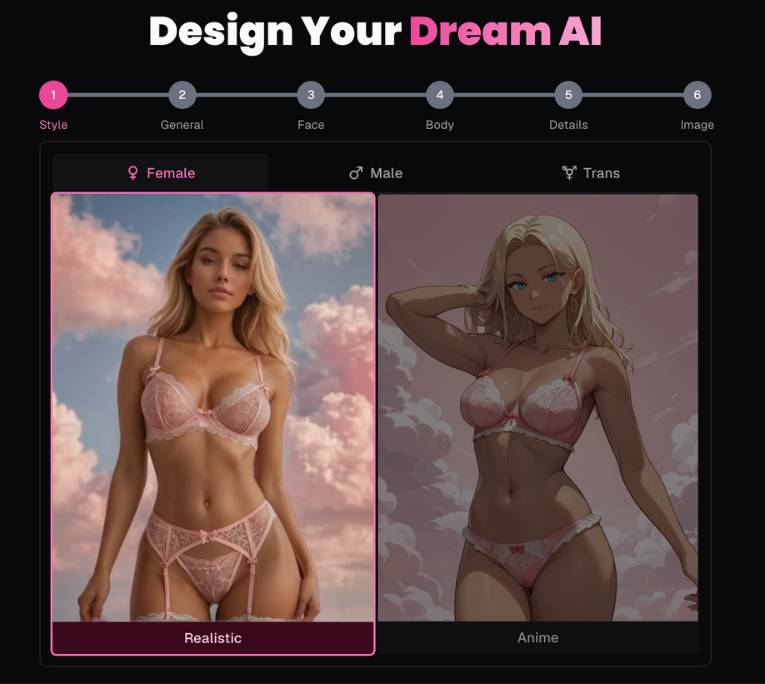
Tabs across the top: Female / Male / Trans. Pick the character’s gender first-this sets default faces, voices, and body presets.
Panels:
- Realistic vs Anime: Select the look of generated images.
- Realistic gives photoreal portraits.
- Anime gives stylized illustrations.
Tips
- Decide the final use (photos vs manga-style cards) before moving on; switching later may reset some fine-tuning.
2) Set ethnicity, age, skin tone
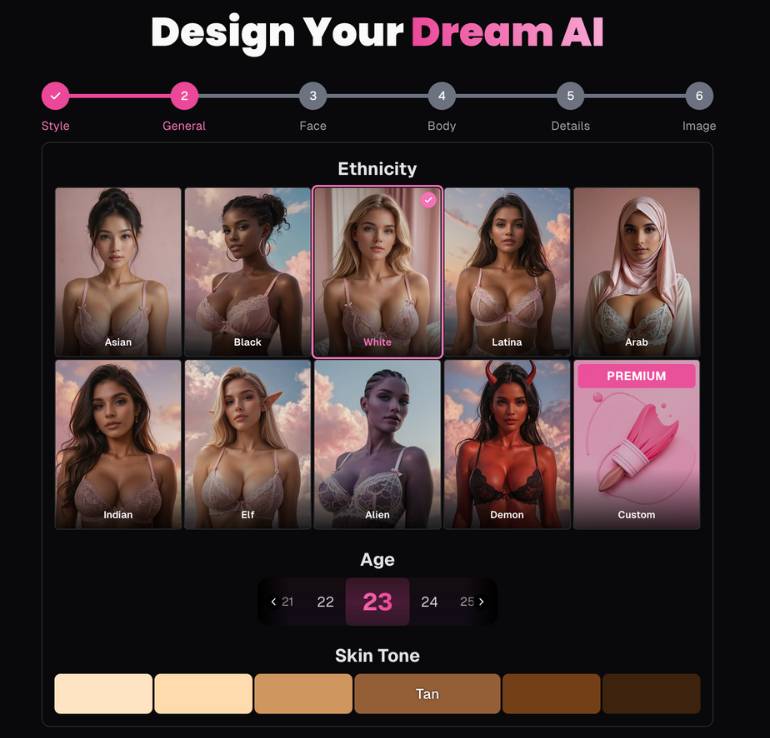
Ethnicity grid: Asian, Black, White, Latina, Arab, Indian, Elf, Alien, Demon, plus a Premium → Custom tile.
Choosing one nudges facial features and skin palettes toward that category.
Age selector: Stepper with numbers (e.g., 22, 23, 24, 25). Keep it 18+.
Skin Tone swatches: From very light to deep, with a Tan preset. Click a swatch to apply immediately.
Tips
- If you plan a sun-kissed look, pick the base tone first, then refine to Tan.
- Fantasy types (Elf/Alien/Demon) can be combined later with hair and eye colors for cohesive themes.
3) Face – eye color, hair color, hair style
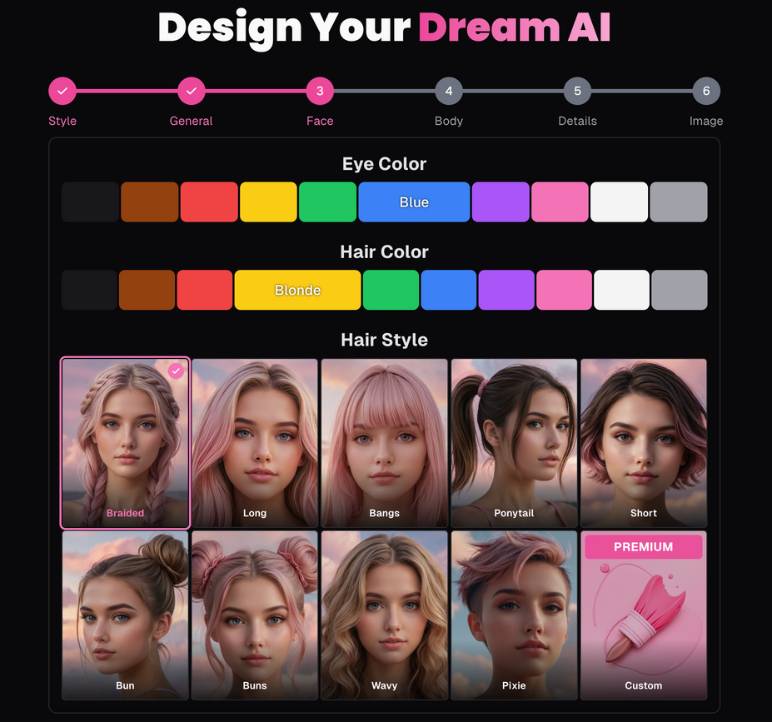
Eye Color row: Click color swatches (e.g., blue, green, hazel, grey). The active one shows a label (like Blue).
Hair Color row: Natural and dyed choices (black/brown/blonde/red plus vibrant greens, blues, purples, pinks, white/grey). A pill like Blonde shows the current pick.
Hair Style grid:
- Braided, Long, Bangs, Ponytail, Short, Bun, Buns (double buns), Wavy, Pixie
- Premium → Custom for ultra-specific requests.
A pink checkmark highlights the active card.
Tips
- Pair dyed hair with matching eye accents (e.g., violet eyes + purple hair) if you’re going for a stylized vibe.
- For “girl-next-door” aesthetics, keep hair natural and use Bangs or Wavy.
4) Body – body type, bust size, butt size
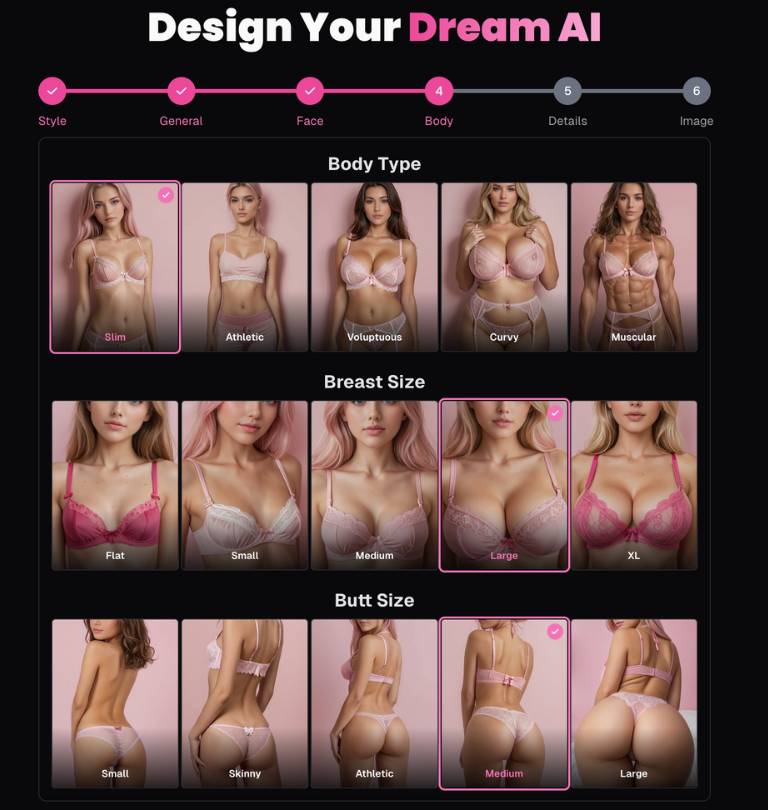
Body Type: Slim, Athletic, Voluptuous, Curvy, Muscular.
Breast Size: Flat, Small, Medium, Large, XL.
Butt Size: Small, Skinny, Athletic, Medium, Large.
Selections preview instantly in the sample tiles.
Tips
- Choose Body Type first; then adjust proportions so everything feels balanced.
- Athletic builds pair nicely with Athletic butt size for a coherent silhouette.
5) Details – name, voice, personality & advanced fields
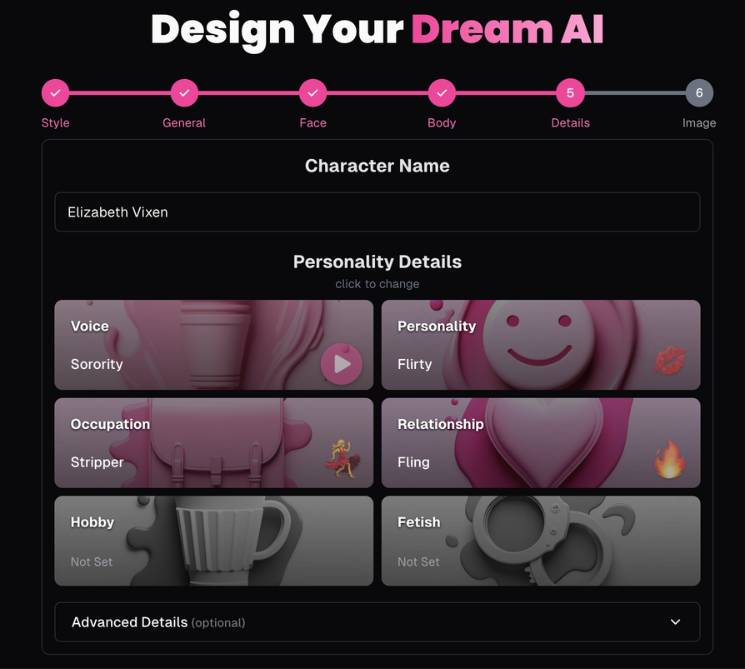
Character Name: Free text (e.g., Elizabeth Vixen). Keep it unique; it’s shown on the profile card later.
Personality Details (clickable cards):
- Voice (e.g., Sorority, later you’ll also see Coach). Includes a ▶︎ play icon to sample.
- Personality (e.g., Flirty). Sets conversational style.
- Occupation (e.g., Stripper in your example-choose something that fits your narrative).
- Relationship (e.g., Fling). Frames how the AI relates to the user.
- Hobby and Fetish (optional). Leave unset if you don’t want niche behavior; you can always refine later.
Advanced Details (accordion)
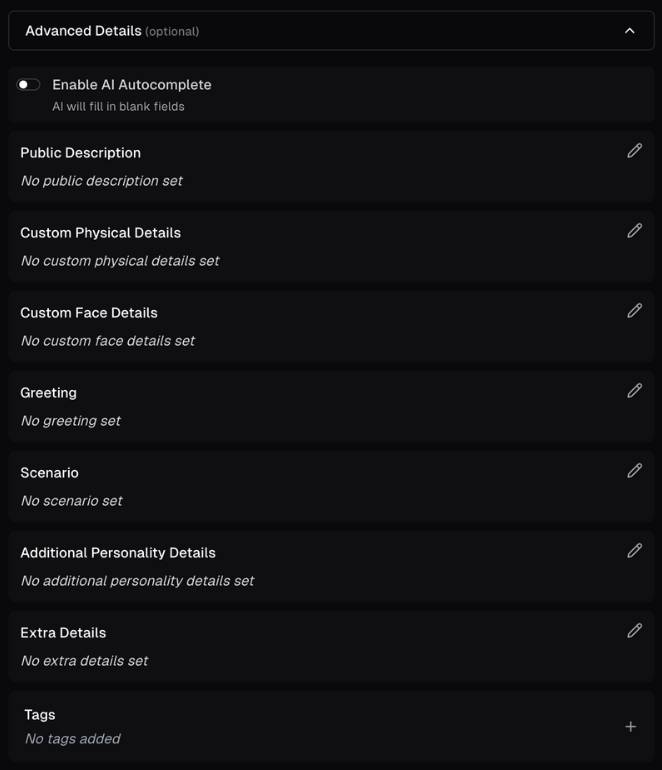
- Enable AI Autocomplete (toggle): Let the system fill blanks based on what you’ve set.
- Public Description: A short bio others may see.
Example: “Playful fitness model who streams sunrise yoga and loves sarcastic banter.” - Custom Physical Details: Free-form cues (height, freckles, tattoos, piercings).
- Custom Face Details: Eye shape, freckles, dimples, beauty marks, makeup style.
- Greeting: The very first message the character sends.
Example: “Hey stranger-caught you staring from across the hall again? ☺️” - Scenario: Starting context/lore.
Example: “She’s your new neighbor; you met in the lift after a gym session.” - Additional Personality Details: Quirks, boundaries, humor style.
Example: “Dry wit, loves teasing, hates small talk, sets clear consent rules.” - Extra Details: Anything that doesn’t fit elsewhere (likes, dislikes, goals).
- Tags: Add searchable tags (e.g., yandere, influencer, neighbor).
Tips
- Use Greeting + Scenario to steer the first chat.
- If you enable Autocomplete, review what it adds-edit for tone and safety before finalizing.
6) Image – final preview & quick edits
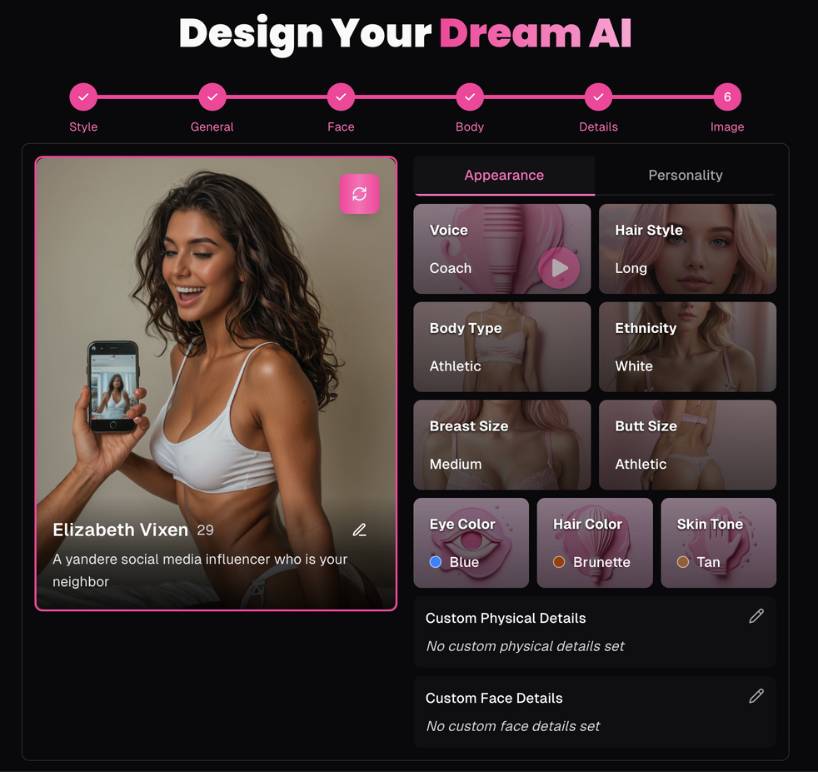
You’ll see a profile card on the left and edit panels on the right.
Left card:
- Large portrait with a refresh/regenerate button (circular arrows) to re-render the image without losing settings.
- Character name and age under the image (e.g., Elizabeth Vixen, 29).
- A short bio line (e.g., “A yandere social media influencer who is your neighbor”).
- A pencil icon lets you rename or edit the tagline in place.
Right panel – two tabs:
- Appearance
- Voice (with ▶︎ preview)
- Hair Style
- Body Type
- Ethnicity
- Breast Size
- Butt Size
- Eye Color (radio dot shows active)
- Hair Color
- Skin Tone
- Custom Physical Details / Custom Face Details (pencil icons to edit those advanced fields again)
- Personality
- Mirrors the personality cards (Voice, Personality, Relationship, etc.) so you can tweak behavior without going back a step.
What to do here
- Click refresh until the portrait matches your mental image.
- Use the Appearance controls for micro-adjustments (e.g., switch Wavy → Long hair).
- Jump to Personality to tighten the vibe (e.g., change Flirty → Playful tease).
- Re-edit Greeting if you changed the backstory.
Pro setup tips
- Consistency first: Lock Style, Ethnicity, and Skin Tone before fine-tuning hair/eyes; it keeps renders coherent.
- Name + Tags: Make them descriptive so you can find the character later.
- Boundaries: In Additional Personality Details, set comfort levels and red lines (consent, no illegal topics, respectful language).
- Voice preview: Always hit ▶︎ to ensure the voice matches the persona (e.g., confident “Coach” vs bubbly “Sorority”).
- Regenerate wisely: Use the refresh button after small tweaks to converge on the look you want.
Troubleshooting
- Result looks off after a big change: Go back one step (e.g., from Image → Face) and toggle the setting off/on; then regenerate.
- Overly generic responses: Fill Greeting, Scenario, and Additional Personality Details with 2–4 concise, specific lines rather than one long paragraph.
- Clashing colors: Neutral hair (brown/black) with vivid eye color often reads cleaner than vivid hair + vivid eyes.
Finishing up
Once you’re happy with the portrait and profile card on Step 6, save/confirm (use the app’s Save/Create button if present) and start chatting. You can always come back to the Image screen to regenerate a new photo or to Appearance/Personality to tweak the vibe-without rebuilding from scratch.